Robin's Urban Farmhouse
  • Robin\\\\\'s Latest
  • Meet Robin
  • The Chickens
  • The Garden
  • The Bakery
  • The House
  • Untitled

Lemon Chicken with Capers

1/30/2013

0 Comments

 
Picture
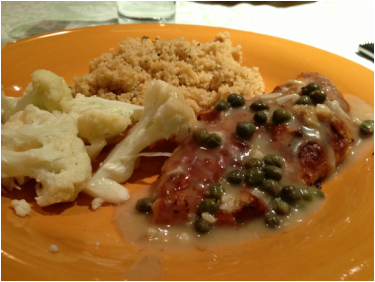
We found a great recipe for lemon chicken with capers.  Thought I would share because it was delicious! We enjoyed the chicken with steamed cauliflower and garlic herb couscous.  It took about 30-40 minutes to get everything cooked.  I skipped flattening the chicken with a mallet and just bought thin slices chicken breasts. 

Picture
From Food.com By Gatorbek
Servings:4

Ingredients:
4 medium boneless skinless chicken breasts
1/2 cup flour, divided
1 teaspoon salt
2 eggs
2 teaspoons olive oil
2 tablespoons butter
2 tablespoons garlic, minced
1/2 cup chicken stock
1/4 cup dry white wine
1 large lemon
2 tablespoons capers, drained and chopped
1 tablespoon fresh parsley, chopped

Directions:

1) Place each chicken breast between two sheets of wax paper. With a mallet, flatten each to about 1/4 inch thick. (This is not necessary if you buy think sliced chicken breasts)

2) In one pie plate, beat eggs slightly.  In another pie plate, mix 1/4 cup flour with salt.

3) Coat chicken with flour mixture, then dip in egg. We dipped the chicken in flour one more time and then put it on a plate until all the chicken was coated so some didn't cook more than others. Add more flour and salt as needed. 

4) In nonstick skillet, heat olive oil over med high heat until hot.  Stir in 1 Tbsp butter until melted.

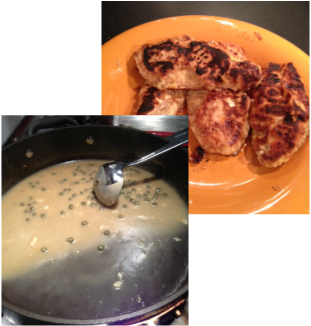
5) Add chicken. Cook 5 minutes to brown, then reduce heat to med.

6) Turn chicken and cook about 4-5min more until juice runs clear when pierced.  Then transfer chicken to a warm dish.

7) Lower heat if needed to maintain medium-low to medium heat so as not to scorch the garlic, then add garlic to the drippings in the skillet.

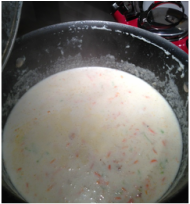
8) In a cup, mix stock, wine, lemon juice, and 1 1/2 teaspoons of flour until smooth. 

9) Stir into mixture in skillet. Scrape skillet to incorporate any browned bits from the chicken.  Heat to a boil, boil 1 minute. Stir in capers and remaining 1 tablespoon of butter, simmer until thickened.

10)Pour sauce over chicken, sprinkle with parsley and garnish with additional lemon slices.

Note: Occasionally, this has turned out a little more "tangy" than I would like with too much lemon. If this happens, just dilute with a little extra chicken stock or broth mixed with cornstarch or flour to keep thicker consistency.


Read more at: http://www.food.com/recipe/skillet-lemon-chicken-with-capers-281300?oc=linkback

0 Comments

Fun Dinner Idea!

1/24/2013

1 Comment

 
Picture
Make your own pizza night! My sister Dana and her boyfriend Sean often join us for a quiet Sunday night dinner to recover from whatever fun was had that weekend.  Dana (a veggie) had some soyrizo at home that she was all excited about.  So we decided to make our own pizzas tonight.  
 

Picture
As I was preparing for them to come over I realized that it was a super easy dinner to get ready and that I should share it all with you! 

The only thing that took a little forsight was the dough.  If you have a bread maker it is easy to throw all the ingredients in and hit the dough cycle.  You just have to remember to do that about 2 hours before you want to eat.  Otherwise, there is always Boboli!

Once the dough is ready, you punch it down and kneed it.  Cut the dough according to how many pizzas you are making and flatten them out.  We then spread a little olive oil and punched them with a fork, so no big bubbles disrupt your toppings while it bakes.  Let the dough sit for about 15 minutes before making the pizzas. 


Picture
I walked to the grocery, bought one bag of items and had it prepped in about a half an hour.  Just for the presentation I put all the possible toppings in little bowls.  This way you can survey the goods before you make any commitments. I put out pizza sauce, mozzarella cheese, and parmesan cheese.  For the meats we had turkey salami or the vegi option of soy chorizo.  For the veggies I slices cherry tomatoes, fresh basil, marinated artichoke hearts, slices mushroom, and pineapple.  Of course you can out whatever toppings you would like! Lastly I included some homemade olives and roasted garlic.  

Picture
I have to give some credit here to my flagrantly Italian/Spanish friend Tyler. Years ago he taught me how to make delicious roasted garlic.  Tyler, feel free to correct me here if I have made any procedural errors! First you slice of the top of a head of garlic (I may have sliced off a bit too much on this one). Drizzle a bit of olive oil on top.  Wrap it in foil with the sliced top pointing up and bake it at 350 for about 40 minutes.  
You'll end up with the most delicious, mild, roasted garlic flavor that can be spread on just about anything! You want the cloves to be soft, but not mushy.  I checked them with a toothpick here and there. 

Picture
So finally, let everyone top their pizzas. (isn't Justin handsome)  Bake them at 425 until the top of the cheese starts to brown and  bon apetite! 

We added a game to mix while we were eating.  However, I lost big time, so it wasn't nearly as fun as last time I played when I won!!

1 Comment

Broccoli-Cheddar Soup

1/17/2013

0 Comments

 
Picture
     On a frosty winter day, an entire dinner themed "Comfort foods" sounds pretty good! It was time for our monthly 'family dinner' with friends, and a comfort food was your ticket in the door.  After debating over several different soups, I decided to try broccoli cheddar.  I got the seal of approval at dinner that it was blog-able, so here it is! 
    Although I have been a super lazy blogger lately, I have been cooking! The urge to share it has returned!
    

Picture
     I originally got the recipe off of the food network.  Here is the link to it.  After reading several of the reviews and doing some taste testing I changed quite a few things.  So below if my version. I was cooking for a large group.  I would say that it serves 8-12 depending on whether you are eating it as a main course, or a starter. 

Picture
Ingredients:
  • 3/4 cup butter (12 T) butter 
  • 2 small onion, chopped
  • 1/2 cup all purpose four 
  • 4 cups (1 quart) half-and-half (fat free version is optional depending on what you news year's resolution was)
  • 4 cups low-sodium chicken broth (I also added one cube of chicken bouillon for an added richness in the flavor)
  • 4 bay leaves
  • Kosher salt (I didn't need any) and freshly ground pepper
  • 8 7-inch sourdough bread  boules (round loaves) (If you are wanting to eat fewer carbs, you can always use normal bowls)
  • 6 cups broccoli florets (about 1 1/2 heads)
  • 1 large carrot, diced
  • 1 stock of celery chopped finely
  • 2 1/2 cups (about 8 ounces) grated sharp yellow cheddar cheese, plus more for garnish
  • 4 ounces cream cheese

Picture
Notes:
    I used my food processor and grated all the vegetable except the broccoli. I then gave it a little rinse and used it to grate the cheese.   This made it really quick and easy! 

The original recipe calls for the soup to be pureed, however I enjoyed having some variance in texture.  So grate everything small instead of chopping and avoid the pureeing. 

The broccoli is kind of the star of the show, and thus should not be grated.  I chopped half of it very fine to enhance the flavor of the soup, and left some of it a bit bigger to give a chunkier texture to the soup.  

*If you decided not to use bread bowls, I think some cubed potato would be another yummy and nutritious addition. 


Picture
Directions:
Melt the butter in a large Dutch oven or pot over medium heat. Add the onion and cook until tender, about 5 minutes. 
Whisk in the flour and cook until golden, 3 to 4 minutes, then gradually whisk in the half-and-half until smooth. 
Add the chicken broth, and bay leaves,  then season with salt and pepper and bring to a simmer. Reduce the heat to medium-low and cook, uncovered, until thickened, about 20 minutes.

Meanwhile, prepare the bread bowls: Using a sharp knife, cut a circle into the top of each loaf, leaving a 1-inch border all around. Remove the bread top, then hollow out the middle with a fork or your fingers, leaving a thick bread shell.

Add the broccoli, carrots, and celery to the broth mixture and simmer until tender, about 20 minutes. Discard the bay leaves. 

Gradually mix the cheese into the soup and whisk over medium heat until melted. Add up to 3/4 cup water if the soup is too thick. Ladle into the bread bowls and garnish with cheese.
Lastly, enjoy the warm richness of soup on a cold day, an seen above!

0 Comments

Third Trimester

1/13/2013

0 Comments

 
Picture
       I have officially entered my third trimester! I am relieved.  Every week I get closer I feel better about the chances of the baby being born healthy! The worried mom thing sure kicked in fast! 
       You hear about all these crazy things that pregnant women do, and you think "I'll never do that"  but then your body takes over.  I am not naturally a clean  person, but my husband has been working hard over the last ten years to make me one.  Once the third trimester hit, it was like this foreign nesting bug took me over! I have been cleaning out closets and drawers that were long over due! I know it has been way too long, because today we went on a crazy sorting binge to take things to good will and an old teaching ID from 2006 fell out of the purse I was donating! 
     Beside having crazy urges to get organized, it is such an amazing and exciting time.  I think somehow being pregnant is a slight beacon of hope for people.  Yesterday I was standing at a crosswalk opposite a couple waiting for the light to change and the woman was clearly pointing at me and talking to her partner about my belly. Upon crossing, she stopped me on the street to tell me how excited she was for me and that she hoped she was just like me one day.  It reminded me that amazing things that are happening to me as I go about my day.  I can feel the baby move on and off all day now.  When I am lying down you can even see him kick and drag his heal (or some body part) along my belly!

Picture
      After debating for a long time whether or not to find out the sex of the baby, we gave in to our curiosity.  As you can see from the rather graphic picture, it is a boy! 

Picture
       As the clock ticks, the nursery begins to take shape.  First we had to get rid of all of our guest room and office furniture that currently occupies the "baby room".  Then we had to sort a ridiculous number of files to condense them into out new mini office. It looked like this awful mess for a long time. 
      Then it was project time! We haven't worked on a good messy project in our house for a while so it was kind of fun.  As most 90 year houses do, we have plaster walls which means there are cracks.  So I started by plastering over all the cracks. Wait a day and sand.  Then we painted. Back when Justin didn't know if the baby was a boy or girl, he was fairly impartial to everything baby.  So I picked out the paint color, and crib color, and changing table color myself.  Then we found out the baby is a boy and out came the involved Dad in him. So after the first coat of paint it was decided that we needed a new color.  We also sent back all the furniture I had and got a different crib and changing table and ...Yes, I am kind of complaining, but in the end I am happy that he is involved now.  Paint again, and then take a deep breath.  

Picture
     The good news is that the room is really taking shape! We wanted a neutral gray that could work if the the next baby was a boy or girl and something simple so that it has a calm energy about it for mom and dad! 
    We buit the crib and changing table and I love them.  I also laid out some adorable baby things that I am starting to collect and they always make me excited!
   So I am plugging along, taking my vitamins and exercising.  I look like I swallowed a soccer ball, and I couldn't be happier!  


0 Comments

    Robin's Blog

    I am living in Downtown 
    Sacramento creating my little urban farm!

    Archives

    June 2014
    April 2014
    January 2014
    July 2013
    April 2013
    January 2013
    November 2012
    October 2012
    September 2012
    August 2012
    July 2012
    June 2012
    May 2012
    April 2012
    March 2012
    February 2012
    January 2012
    December 2011
    November 2011

    Categories

    All
    All
    Appetizers
    Breads
    Breakfast
    Chickens
    Crock Pot
    Desserts
    Fall Foods
    Gardening
    Gifts
    Holiday
    Holiday Foods
    Home Improvements
    Recipes
    Salads
    Sewing
    Soups
    Travel

    RSS Feed

Powered by Create your own unique website with customizable templates.