Robin's Urban Farmhouse
  • Robin\\\\\'s Latest
  • Meet Robin
  • The Chickens
  • The Garden
  • The Bakery
  • The House
  • Untitled

When egg production comes to a halt...

11/29/2011

0 Comments

 
Picture
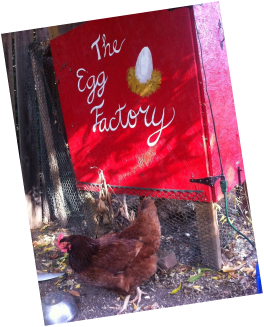
When the assembly line crunches to a halt it is a sad day.  The chickens stopped laying eggs for the winter.  Last year the eggs kept coming even through the cold.  We only had a few eggs a week from each chicken, but it was enough.  For over two weeks Barbecue and Nugget had not been pulling their weight.  
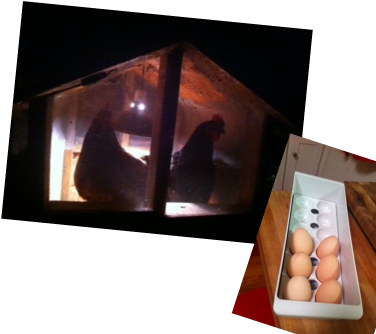
     So my lovely husband installed a heat lamp with a timer. It seems to have extended their day by a few hours.  They sit up in the roost having what I like to call "TV time".  They warm their tail feathers in the light and relax while preening their feathers.  It is pretty cute.  But the best part its, we have eggs again! 6 in the last week.  Somehow we have cheated mother nature! 

Picture

0 Comments

Making garbage into gold! Composting.

11/28/2011

1 Comment

 
Composting:
Composting is one of the most efficient, green ways to run a household! First of all, you reduce your garbage by quite a bit.  Secondly, you are providing yourself with environmentally friendly, free, safe fertilizer.  WIthout replenishing the garden soil each year, you will not have healthy plump vegetables. 
You do not have to be total gung-ho hippy to compost. I forget about it for weeks at a time, and then get all involved again.  The good news, it everything keeps rotting whether you are paying attention or not!  So here are a few hints to get your composting started. Ken Thompson wrote a cute little book called Compost if you are looking for more information.  And as always, I would love questions!
Picture
1) Get a container
~If you live in Sacramento, you can buy a stackable compost bin from the city of Sacramento for about $65 which is roughly half of what they retail for. 
~You can also easily build one from scrap material laying around your yard.  The key thing is that, the compost needs some air, and some barriers to hold in moisture.  I would recommend having four side walls and a roof.  The bottom can be left open so the nutrients can seep into the soil underneath the bin. We tried the "pile" thing and we ended up with a lot of dried material that never composted. 

Picture
2) Load it up with garbage!
~You want your compost bin to have a balance.  You should put any plant materials that are left over from cooking in your compost. I have this little "garbage can" in our kitchen for the compostable materials.  It has an odor barrier on top so your kitchen won't smell.   Coffee grounds (even still in the paper) are great for adding some acidity. You should put in yard clippings like grass or leaves.  If you are going to put in sticks, cut them into small pieces or they take forever to break down.  If you have lovely adorable chickens, you should put their wood shavings and poop from the coop, and the egg shells in the compost bin.
~Strive for a balance of these things so the pH stays at a good level (I don't know anything more about the science of it than that).
~Do not put meats, oils, or fats in you compost.  They will attract unpleasant hungry animals, and the bin will smell like rotting meat.  The compost should be primarily plant derived with the exception of some of the chicken "products" I mentioned above.

Picture
3) Turn it
~About every two months the compost needs to be turned.  If you have a stackable composting bin, then take the top layer and move it to a new, nearby location. Start moving the compost into this layer.  This will make it so that they nutrients seeps into a different parcel of soil.  If your bin then you may need to remove the top layer, mix things up , and put it back in. 
~The goal in doing this is to move the composting materials to locations with different levels of air and moisture.  It also keeps you from getting layers of material that are stuck together, or dried and they don't decompose.  I leave this mini pitch fork by the bin and then it is always available when I get a whim to turn the compost. Lastly, turning your compost gives you access to the goods at the bottom!

Picture
4) Spread it
~Once you get to the bottom of your bin and you find the gold, the stuff that smells like forest floor and it almost the consistency of crumbly dirt, spread it! In the spring before planting I till it in, but during the rest of the year, I simply spread it on the surface of the soil.  It brings nutrients and replenishes the soil.  The compost can also act as a weed and moisture barrier.  It does amazing things for your garden, it is free, and it reduces your trash! Why would you not!

1 Comment

Beef Brisket

11/27/2011

4 Comments

 
Picture
     I hope everyone had a wonderful thanksgiving! What is the most delicious thing you ate? I would love you to add the recipe to the comments section.  My husband and I hopped on a plane and went to Tucson to see his family.  It was warm and beautiful.  We ate well, hiked in the desert mountains, and had a great time with the fam! I have a ridiculous amount of things to be thankful for!
      Now that it is time to settle back into the normal routine of things I thought I would offer up a yummy winter dinner idea.  Beef Brisket.  It's no vegetarian delight, but I got major bonus points from my meat eating dad and husband for this recipe. 
     It is a perfect thing for a Monday.  You can take about 10 minutes to prepare everything the night before.  In the morning, turn on the slow cooker and dinner will be ready when you get home!

Picture

Ingredients:
  • A cut of beef brisket.  
  • 2 tomatoes (quartered)
  • 1 onion (quartered)
  • 1/2 Cup red wine
  • 1/4 Cup brown sugar
  • 5 cloves of garlic
  • worcestershire sauce 
  • 1 teaspoon salt
  • sprinkle pepper
You favorite herbs, I used
  • 1 teaspoon coriander
  • 1 teaspoon parsley
  • 1 teaspoon basil
     The brisket should have one side that is fattier than the other.  Place the brisket in the ceramic part of your slow cooker fat side up.  Then add in all the vegetables.  Feel free to make this your own.  Carrots and potatoes are nice additions if you have them handy.  Put your herbs on top of the meat.  You can use fresh or dried herbs, whatever is most accessible.  Add in brown sugar.  Zigzag the worcestershire sauce back and forth over everything.  Lastly add in the wine (feel free to go overboard on this). If you are storing this overnight, cover it and put it in the fridge.
     Before cooking add enough water to the pot to ensure that everything is submerged.  One of the first times I made this I skimped on the water and ended up with hard, dry, totally burnt brisket.  Set the slow cooker on low for 8-10 hours, or high for 4-5 hours.  At the end the meat should pull apart with the fork, your house will smell delicious, and all you have to do is plate the food and serve!

4 Comments

Robin's urban farm house via email

11/23/2011

0 Comments

 
If you would like to receive my blog posts as an email, I put a form on my MEET ROBIN page.  Then I can send them to your fingertips! I am the only one who can see the information and I won't be sharing it.  
Picture
0 Comments

Winter Garden

11/23/2011

0 Comments

 
Picture
     If your vegetable garden is looking like mine (sad, yellow, and a little bit dead) then it is time to do some pulling! Out of laziness I had not pulled up my summer garden yet.  To my surprise I still had a few gems hiding in there.  If you planted a winter garden, what did you plant? How did it work out?
    During the winter there is not nearly as much maintenance necessary in the garden so it is a good time to prepare the soil for the next planting season.  You will definitely need some sort of compost bin to put all the remaining plants.  If you don't, then just make a pile for now.  Send me a comment and I can give you some ideas!

Picture
Step one:
Pull all the remaining plants that grew during the summer.  If the roots are hard to pull up you can cut off the plant and let the roots rot in the soil for the winter.  If  you planned ahead for a winter garden, obviously leave those plants to continue to grow. I discovered today that I had some chard, lettuce, peppers, carrots, and onions growing so I decided to leave them for a few more weeks.  I have to admit, I didn't plant a winter garden, but these fighters either held on from the summer, or were seeds that waited until fall to germinate. 
If your compost bin is stackable, put the top layer in a new location.   Put all the pulled up plants in the compost.  The smaller you chop everything up, the quicker they will decompose.  
I took of picture of this compost to show you that this is NOT ready to spread.  Leave this size material in the compost bin. 

Picture
Step two:
Dig down to the bottom of your compost until you find the stuff that looks almost like dirt.  It should smell like forest floor.  If it smells rotten or stinky it is probably too wet. If the leaves are dried and crunchy, then it is to dry.  I will get into more details about composting another time.
Spread this mulchy compost over the dirt where you will be planting next year.  If you are feeling very ambitious you can till the compost in the soil, however leaving it on the surface is just fine! 

Picture
Step Three:

After the compost is down you want to lay some sort of weed barrier.  I used hay.  It is cheap and fairly easy to access.  We got ours at the pumpkin patch and used it for porch decoration with our pumpkins.  Any local feed store should have some.  
The hay will act as a weed barrier and an insulator.  It reduces the sunlight that can get to weeds.  It will keep the soil a bit warmer in the winter and allow for better composting. If you have plants that you want to keep, simply spread the hay around them.
I am working on my garden in sections.  So today I just winterized what you see.  The rest will have to wait until another day! 

0 Comments

Thank Goodness for Pie

11/22/2011

3 Comments

 
Picture
      If you are looking for a way to spice up the pie that you make the same way every Thanksgiving, here is a fun way to do it!  I got this idea from the same book as I mentioned before What's Up Cupcake. 
You will need:
one stick of butter
bag of powdered sugar
vanilla
green food coloring
two stick pretzels
one box of Honey Bunches of oats
a few round sprinkles

        I made a simple frosting by melting butter, adding a teaspoon of vanilla, and adding powdered sugar until it was the right consistency.  That was the base of the turkey body.  I then slightly melted a caramel in the microwave.  Roll it out with a rolling pin to make a sheet of caramel.  Using a biscuit cutter, or the rim of a water glass, cut out a circle in the caramel.  Wrap this around the frosting body and shape it so it looks like a turkey. Put a blob of frosting at the end so you can stick the "stuffing" on.    
     Using another caramel, wrap the end of a pretzel stick to make the legs.  You have to shape them a bit.  Break off the other end of the pretzel so it is an appropriate length.  With a toothpick, dab on a bit of the frosting so the ends are white to look like the paper coverings. 
    In a small bowl melt a bit of the frosting until it is almost a liquid.  Put in some green food coloring until it resembles lettuce coloring.  Put the flat pieces of cereal in and gentle mix them until they are covered in green.  Set them on waxed paper until the frosting cools and is no longer liquid.  Do the same with some sprinkles.  
      Stick the "bunches of oats" on the frosting blob to look like stuffing.  Add in the green sprinkles.  tuck the lettuce garnish under the body of the turkey.  Touch the legs of the turkey with a drop of water to make it sticky and attach the legs.  Now you have an adorable decoration that can go on any pie and spice things up! Happy Thanksgiving!


This is your new blog post. Click here and start typing, or drag in elements from the top bar.
3 Comments

Use it or lose it!

11/21/2011

0 Comments

 
Picture
     Left overs, here I come! The roast chicken.  It turned out delicious, but of course the two of us did not eat the entire chicken in one sitting.  Make life easy on yourself and use the left overs! I pulled all the remaining meat off the chicken.  The next night I made it into enchiladas. It was a completely different taste so we weren't sick of chicken.
      I took two overly ripe tomatoes (but any tomato will do), one yellow onion, two anaheim peppers from the garden, and Trader Joe's enchilada sauce. I don't know if it is cheating to use the Trader Joe's sauce, but they gave me a taste test in the store and I had to buy it. I slices the peppers down the middle and discarded most of the seeds.  I then chopped the peppers very finely. After that I chopped the onions, and chunked the tomatoes.  I put this in a sauce pan with about a third of the jar of enchilada sauce. I also added a bit of water so that the mixture could come to a boil.  

Picture
      I simmered this mixture for about 20 minutes.  I waited until the tomatoes had cooked in and everything thickened up a bit.        While the chicken mixture was boiling I sauteed two cloves of garlic, and a half an onion in a sauce pan.  I then boiled water for rice in the same pan. I generally put two parts water for one part rice, but follow the direction on your rice package.  I added in one more tomato and sprinkled some cumin, chili powder, and salt.  When the water comes to boil add in the rice.  Let it simmer until the water is all cooked out. Gentle mix it with a fork and serve it on the side.
       After this, line up the tortillas in a casserole dish so they are like a taco shape.  Spoon in the chicken.  Wrap each one up and turn it a quarter turn so that they don't unroll themselves.  I then poured more of the sauce over the top and sprinkled on cheese.  I used a fairly mild mexican mix, but I would suggest a sharp cheddar and whatever other cheeses are your favorite!  Bake them at 400 degrees until the cheese on top begins to crisp.  This should take about 20 minutes. I forgot to take a picture of the final product before we gulped it up, so you will have to use your imagination.  Dinner again, no more meat to buy!

0 Comments

If I only had a brain...

11/17/2011

2 Comments

 
Picture
This little Fall Fellow was actually something that my sister and I created last year - but I thought it was appropriate for the season! It would be a fun dessert for the "Kids Table" at your Thanksgiving Feast! Of course...we made it for adults ;)

We got the idea from this adorable book: What's New, Cupcake?  I suggest a carrot cupcake with cream cheese frosting - but really your favorite recipe will do!  We used Graham Crackers for hat, Reese's Pieces for buttons and eyes, Frosted Mini Wheats for hay, Oreo Cookies for crows, Pretzel rods for the stake, and finally, Starbursts for the trim.  We slightly melted the Starbursts and twisted them into the adorable trim and patchwork.  


Most importantly, it was really fun finding different candies and sweets to create with.  Go crazy, have fun! (and if you attempt, comment and I'll share your picture!)

2 Comments

Dinner Idea: Roast Chicken

11/16/2011

0 Comments

 
Picture
      So, I had never really roasted anything.  I have a beautiful, new, shiny roaster that we received as a wedding present 2 1/2 years ago.  I decided it was time.  I bought a whole chicken at the farmer's market.  If you are a local, I would recommend the Cache Creek chicken from the Sunday farmer's market.  I would also recommend the Lucky Dog beef.  
       I asked the lady that sold me the chicken for some cooking advice.  Per her instruction I completely covered the chicken with salt.  Now I am a big time salt-o-holic, and even for me I was worried this was overkill.  However, the chicken did not turn out salty, it was delicious! After this rub or sprinkle on whatever herbs you think are the tastiest.  I put on some basil, garlic, season all, and a poultry blend.  At the end I sprinkled a bit chili powder for a little kick.  Place the chicken in the roaster with the lid on at 400 degrees.

Picture
       After about 45 minutes I added the potatoes.  Make sure to poke them with a fork so they don't burst. I basted them with the juice that had dripped from the chicken.  It was all full of the delicious herbs. If you use bigger potatoes, put them in earlier.  I also basted the chicken a bit.  Continue baking it for roughly another half hour. The whole thing took about 1 1/2 hours to roast. 
        I was of course nervous about overcooking it, so I cut the chicken open (twice) to test it.  Thus, it has two ugly slices in the top.  The chicken tasted rich and juicy.  I got high marks from the husband.  I would highly recommend it!

0 Comments

Baby Shower

11/14/2011

2 Comments

 
Picture
     Last weekend we had a shower for my good friend Ashley.  We have been friend since second grade and this is her first baby, well babies, so it was very exciting! She is pregnant with twin girls. 
      My mom, sister Dana, and I decided we would make her baby quilts for the new little ones.  It is sort of our tradition for first babies!  We used matching white and butterfly fabrics to tie the quilts together.  The letters are of course the initials of the baby names.  Now they have something cozy to crawl around on! If you have any questions about how we made them feel free to as in the comments (I don't want to bore everyone else).

Picture
       Along with a party came cupcakes...Ashley thought it would be fun to have the cupcakes be the party favors (which it was).  I found adorable little boxes on line for individual cupcakes and everyone got to take one home.
        I started by making the decorations.  I bought premade fondant at Michael's.  You can also make it yourself, but it adds a step.  I then tinted the fondant.  It is best to use a gel food coloring or the really potent coloring from the craft store.  This way it won't make the fondant sticky.  I then rolled it out using powdered sugar to keep the fondant from sticking to the counter. 

         I cut out a onesie with a paring knife until I got it just right. Then I placed that on top of the rolled fondant to cut the rest.  I used a clean tweezer to make the stitching indentations and sprinkles for the color.  I did the rattles in much of the same way, although I used the food coloring cap like a cookie cutter to get the round shape.  The peas in the pod of course represent to two twins. This was basically done by cutting out a circle and rolling two spheres.  I flattened the edges a bit with the back of a spoon and set them to dry over night. 
    The next day I made the chocolate cupcakes.  Lastly the day of the party I made a cream cheese frosting. Of course finishing them the day of the party made me panic and my sister came over to help me.  I have to give her half the credit for everything I bake because she always helps me! They turned out pretty delicious and they were a fun favor idea!
   If you are interested in the frosting recipe, let me know! Have a delicious night!

2 Comments
<<Previous

    Robin's Blog

    I am living in Downtown 
    Sacramento creating my little urban farm!

    Archives

    June 2014
    April 2014
    January 2014
    July 2013
    April 2013
    January 2013
    November 2012
    October 2012
    September 2012
    August 2012
    July 2012
    June 2012
    May 2012
    April 2012
    March 2012
    February 2012
    January 2012
    December 2011
    November 2011

    Categories

    All
    All
    Appetizers
    Breads
    Breakfast
    Chickens
    Crock Pot
    Desserts
    Fall Foods
    Gardening
    Gifts
    Holiday
    Holiday Foods
    Home Improvements
    Recipes
    Salads
    Sewing
    Soups
    Travel

    RSS Feed

Powered by Create your own unique website with customizable templates.