Robin's Urban Farmhouse
  • Robin\\\\\'s Latest
  • Meet Robin
  • The Chickens
  • The Garden
  • The Bakery
  • The House
  • Untitled

Chicken Pot Pie

1/31/2012

0 Comments

 
Picture
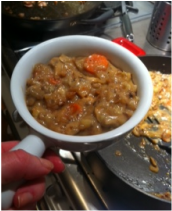
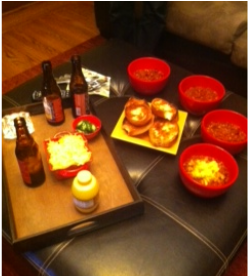
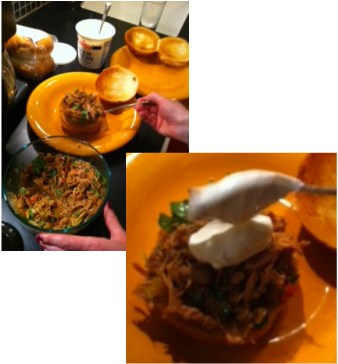
     While pot pies are pretty high on the comfort food hall of fame, they are also rank extremely high on the fat and calorie count.  Since healthy versions are nearly impossible to find the freezer isle or restaurant, a homemade pot pie is the way to go.  This recipe may not be fat free...but it's a less glutenous version.  And it's delish!

Directions:
1. Start by making pie crust (click for the link to the recipe).  Put the pie dough in the fridge to chill while you work on the rest.

2.  Preheat the oven to 425 degrees.


Ingredients: (Not including pie crust)
5 chicken thighs
1 yellow onion diced
1 long carrot (peeled)
15 button mushrooms (1 container)
1 teaspoon fresh ground Black Pepper
1/2 teaspoon Crushed Red Pepper
1/2 teaspoon fresh ground Sea Salt
1/2 teaspoon Celery Salt
1 10 3/4 oz can of cream of mushroom soup (I use the 98% fat free)
1 10 3/4 oz can of cream of celery soup (I use the 98% fat free)

Picture
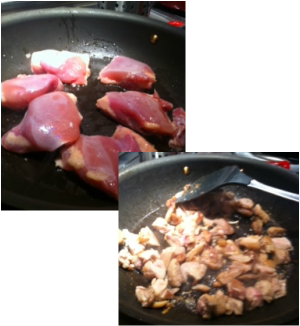
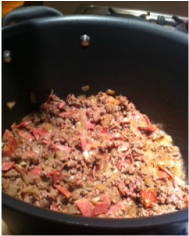
3.  Sauté the chicken thighs on medium/hot heat with a little bit of olive oil.  Continue until each side until it is browned. Remove the chicken to a plastic cutting board and dice it into bite size pieces.  Return it to the skillet and cook until the center is no longer pink.  Be careful not to cook it until the meat is dry.  You will be baking it as well, so you don't have to stress about undercooking anything. 

Picture

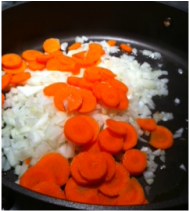
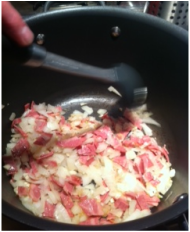
4.  While the chicken is cooking dice the onion.  If you have vegetarians eating with you, sauté the veggies in a separate pan.  Put the onions in a pan at medium heat with a bit of olive oil.  While they are cooking, peel and chop the carrot and add them to the pan.  Slice mushrooms and add.  If you do it in this order, they should all be cooked just the right amount! 

5. Sprinkle in pepper, sea salt, and celery salt.  Sauté the veggies until the edges begin to brown.  

6.  Turn off the heat and add both cans of soup.  Mix everything up.  

Picture
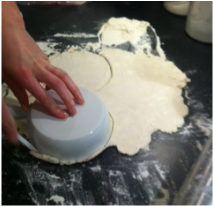
7.  Roll out the pie crust until it is big enough to cover 4 ramekins, or a casserole dish.  If you are using individual ramekins, lay them upside down on the crust and cut along the edges. 


Picture
8.  Fill the ramekins or casserole dishes with the veggie mix.  Add in chicken if you cooked it separately. 
     Place the pie crust on the top.  With the extra I like to cut out a little cookie cutter shape and place it on top for fun.  The extra texture always looks great when it bakes! Don't forget to slit a few holes here and there to let steam out.  

* Here is a little trick of the trade if you are entertaining carnivores and herbivores.  Wrap the vegetarian dishes with a piece of foil, so when they come out of the oven you know what is what!*


Picture
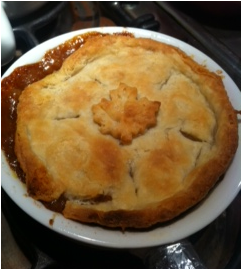
9.  Bake the whole concoction at the top of the oven at 425 degrees for about 30 minutes, or until the crust is brown and flaky. 
      It is going to smell delicious ad you will want to eat it sooner.  I had to fight off my sister and my husband to let them leave the pies in the oven long enough! Make sure to cook the crust all the way or it will be all soggy in the middle.  Enjoy!

0 Comments

Orange Immunity Tea

1/29/2012

3 Comments

 
Picture
      Winter cold and flu season is among us!  This tea is filled with only ingredients that benefit your body and is particularly helpful in fighting a cold.  It has comfort food flavors that we crave in the winter, without the comfort food fat! 
    

Picture
       Last year I won a basket of garden goodies at a fundraiser in Davis.  One of the things in the basket was a book called The Herbal Kitchen by Kami McBride.  Now, this is not a book I would have bought myself, but I started flipping through and found it fascinating.  McBride has taught about herbal benefits all over Northern California including UCSF and UCD.  In her book she discusses how many age old customs of using herbs in cooking have been lost.  People are no longer aware of the extent of the health benefits.  I read further to discover all of the amazing benefits of the herbs I have not only in the garden, but it the cupboard! 
     Anyways, from this I started making a yummy tea whenever I feel a cold coming on.  It is quick an easy! After the recipe I paraphrased McBride's writing to tell you about some of the good things these spices do for you. Take a look, you won't believe how easy it is to put good things in your body!  

Picture
Ingredients: ( for about 2 mugs of tea)
4 cups water
2 bags Chamomile tea 
1/2 teaspoon cinnamon
a pinch of cloves 
a pinch of nutmeg 
     (If needed, you can sprinkle in more herbs if you want it spicier)
orange slices with the peel
2 teaspoon honey
 *You have to read the benefits of honey below, they are incredible*

    If you are making one cup, sprinkle just a bit of the herbs in  the bottom of your cup, put in one tea bag, and add boiling water.  Put a slice of orange on top, let it steep for about 7 minutes.  Right before you drink it, stir in a spoonful of honey.  Mash up the orange a bit as you go to release some of the flavors.  
  
    If you are making more than one cup, cook everything except the honey in a small saucepan.  Put in about a 1/2 a teaspoon of the cinnamon and 1/4 teaspoon cloves.  Add two chamomile tea bags, and squeeze  the juice from the orange slices then add them to the pot with the peels.   Simmer everything for about 7-10 minutes.  This gives it a more rounded out flavor.  Again, right before you drink it, add two spoonfuls of honey to each cup.  

Picture
Chamomile tea
     You always hear how chamomile tea is good to drink before you go to bed.  There is a reason! Chamomile can relax and calm your nervous system.  It also helps to relieve irritability and helps you to sleep.  McBride shared that it is good for children too.  You can put it in their bath before bedtime to help calm everybody down (throw a little lavender in there too if you have it).

Picture
Cinnamon
     Cinnamon actually warms your body and increases circulation.  It also helps with the digestion of grains.  I have been sprinkling cinnamon on my coffee in the morning to try and get a bit more into my diet. Cinnamon also relaxes muscles to relieves menstrual cramps.  In addition it dissolves mucus and congestion which is where it comes in most handy during cold season!  

Picture
Cloves
     Cloves help with colds and coughs.  They open up the sinuses and have antibacterial properties.  Cloves can also help with nausea and you can suck on it to help with a toothache! Who knew!  On a mental note, the smell reminds me of pumpkin pie and makes me feel better before I even take a sip.  

Picture
Nutmeg
     Nutmeg helps you to digest foods, especially dairy foods.  McBride taught me that your body does not digest food as well in the winter because we are exposed to less light.  Nutmeg enables your body to absorb nutrients better.  

   It can also be a helpful sleep aid.  Mostly I like the flavor that it adds.  The nutmeg works well with the cloves.  

Picture
Orange Peels
     We all know that oranges are loaded with vitamin C, which boosts the immune system.  But until I read The Herbal Kitchen I had no idea that the peels were so valuable.  I always threw them in kitchen sink.  There, they are very useful to make my disposal smell good!  
   Besides this, the orange peels help to ward off colds and flu.  They help with the daily wellness and boost your immune system.  Orange helps with coughs and provides vitamin C and Pectin.  Pectin is good for your gut.  
    Since oranges are in season right now you are in luck! Instead of throwing away the peels, slice them up and leave them out to dry.  Then you an use them in the summer months for cooking when the fresh ripe oranges are long since gone.  

Picture
Honey
     You constantly hear about how good honey is for you.  I think my mother in law and I talk about this every time we see each other.  I am a firm believer in all of these wives' tales.  I thought before I went any further I should a do a little research.  In facts, I found that they are all true!! Honey is amazing.  
     McBride taught me that honey has antibacterial and antioxidant properties.  It also aids in the absorption of nutrients. It is best to buy local raw honey if you can find it at a farmer's market or local grocer. Raw honey has healing enzymes in it. 
    I read a study that was done where they tested the effects of honey on people with colds.  They gave 4 tablespoons of honey a day to a random portion of 60 people at the beginning of a cold.  The doctors observing the patients were unaware of who had honey and who did not.  The patients with honey recovered from their colds two days quicker that those without. I thought that was pretty awesome!
   When my husband moved to Sacramento from Ohio, he had terrible allergies.  It was to the point where he was taking daily medicine.  So I went and bought him some local honey.  I gave it to him everyday wherever I could.  I bake it in bread, I put it in salad dressing, sweeten coffee with it, and I spread it on toast.  He now has no allergies!  Every spring I make sure to get a new jar of honey.  Through those smart little bees we get access to the local allergens and build up an immunity.  It's great!

3 Comments

Game Day Chili

1/23/2012

1 Comment

 
Picture
    This chili is spicy and rich, and is great to eat in front of a football game.  It also warms you up on a cold winter night! 
    Although I am usually a proponent of fresh ingredients, this has canned beans and tomato sauce.  It just makes it so easy!    
     The nice thing about this is the preparation time and the cooking time happen simultaneously, so if you're in a hurry you can really have this on the table in about 30-40 minutes. Follow one directions and while that is cooking move onto the next! You will end up with a pot of good stuff! 

(If you want to make this ahead of time, you could make it in the crock pot.  Dump everything in and cook it on low for several hours)

Picture
Ingredients:
1 1/2 lbs ground beef
7 pieces of bacon (turkey bacon works if you're watchin' the waist line!)
15 oz can of  chili beans
15 oz can of red kidney beans
15 oz can of  pinto beans
29 oz can of tomato sauce
1 cup corn
3 cloves garlic 
3 teaspoons chili powder
1 teaspoon salt
1/2 teaspoon black pepper
1 1/2 teaspoon ground cumin
1 teaspoon ground cayenne pepper

Toppings:
Half a block of yellow cheddar cheese
1 Jalapeno

Bread on the Side
1 loaf of fresh fresh bread 
2 tablespoons butter
1 clove garlic

Picture
Directions:
1. Heat a pan to medium heat.  Slice bacon and add it to the pan.
2. While that is cooking chop the onion and add to the bacon.
3. Finely chop 3 cloves of garlic and add.  Cook for about 3 minutes. 


Picture
4.  Add the beef and turn the heat to high.  Break the meat up into small chunks.  Leave it for about 1 minute so it browns, then mix it.  Continue to do this for about five minutes until the meat browns and it starts smelling delicious!  


Picture
5.  Drain the cans of beans.  Add in the tomato sauce and all the beans. Turn the heat to low.


Picture
6. Sprinkle in all the spices and mix.  If you don't like food spicy reduce the cayenne pepper and chili powder by 1/2 teaspoon each.   Simmer everything for about 15 minutes.  You can eat at this point or continue to cook it for up to 45 minutes or until you are ready to eat!  All the flavors will cook in a bit and it will thicken. 


Picture
7.  While this is cooking slice the jalapeno and grate the cheese.  


Picture
8.  If you want to make garlic bread chop 1 clove of garlic.  Melt it in a small dish with 2 tablespoons of butter. Slice the bread.  Baste the butter mixture over the slices.  Broil the bread with the butter side up.  Make sure to watch it! Bread broils very fast! 


Picture
9. Serve the chili, add the toppings and dig in!

1 Comment

Chickens Playing in the Rain

1/22/2012

0 Comments

 
Picture
     When the chickens are being bad, I first try and have a logical talk with them.  I explain why they should not jump on the hot tub and poop.  I explain why we don't want them squawking at seven in the morning.  I also talk to them about the importance of laying an egg everyday.  
     However, sometimes this doesn't work, and we have to resort to more drastic methods of discipline.  This usually involves the hose.  

Picture
       Before we built the chicken fence, Barbecue and Nugget loved to sit on top of our outdoor table like they were the kings of the castle.  This meant when we went out for a nice summer meal on the the porch, we had to do some poop duty first.  We discovered that the chickens hate being sprayed with water! They squawk and waddle away as fast at their little legs will take them until they find a suficient hiding spot or get out of the range of fire.  Using this we trained them to stay of the furniture by spraying them with the hose.  We also bought some awesome squirt guns that work as well.  

Picture
      We have barely had any rain this winter.  Then Friday it dumped! I came home and found the chickens happy as can be, pecking around in the back yard like it was a sunny summer day. This baffles me because they can't stand it when I spray them with water, but they have no problem running around in the rain all day.   They have a perfectly dry three story chicken coop! Crazy chickens. 
     By the way, it is the end of January and I have a dozen eggs in my fridge.  The light on the timer is still working like a charm!! They are wildly enjoying a piece of stale bread in this picture. 

0 Comments

Dave's Biscuits

1/19/2012

0 Comments

 
Picture
I got this message from my friend Dave.  Woops! Apparently I had a few errors on my Savory Biscuits recipe.  Don't worry, I remedied that right away! Mostly I was excited that he tried the recipe and it turned out well!  If anyone else tries a recipe, or find errors, please tell me!! 

From Dave to Robin: I had a friend over yesterday and made the savory biscuits. They looked good but, following the directions we baked them at 40 degrees. After 16 hours they still didn't seem cooked quite enough. :). Actually, the recipe made 5 large biscuits, they took about 25 min. And we're super! Made a ham and cheese sandwich with them. We used a sage and anise covering. Thanks for the recipe.

Picture

To Dave from Robin: AAAH! Thanks for catching that! I really should have someone else proofread these, because I am terrible with typoes! I am so glad you tried one of the recipes, and even happier that it turned out well!! Thanks for the feedback, it is absolutely always welcome. I already made the changes to the post. 

0 Comments

Spicy Citrus Pulled Chicken Sandwich

1/17/2012

2 Comments

 
Picture
    I always see these amazing recipes for slow cooked pulled pork and drool over them.  Unfortunately, we don't keep pork in our house, so I decided to make it with chicken.  My neighbor Marina always makes delicious slow cooked taco chicken.  So with the idea of her chicken, and slow cooked pork in my head, I am going to try and whip something up. 
   I have oranges, garlic, and peppers from the garden.  So that is already a good start! 

Picture
Ingredients:
2 cups water
6 chicken thighs
3 cloves of garlic
1 orange
1 large pepper (or a can of roasted peppers)
1 yellow onion
6 tablespoons brown sugar
1 1/2 teaspoons salt
1 teaspoon pepper
2 tablespoons butter 


cilantro
sour cream
4 Kaiser rolls

Picture

Directions:

Slice the orange, chop the pepper, chop the onion, and chop the garlic.  Throw everything into a crock pot.  Cook it on high for 6 hours.  If you want to put everything in before work you can cook in on low for more like 9 hours. You have got to love the simplicity of a slow cooker!!


Picture
Right before you eat, use a slotted spoon to remove the chicken from the crock pot.  There will be quite a bit of liquid left in the pot.  Roughly chop some cilantro and mix it in with the chicken.  Cilantro is much more flavorful raw than cooked.  It also adds a nice fresh cool flavor that contrasts nicely with the spicy chicken.  

Picture
        Spread a bit of butter on a kaiser roll and toast it.  While this may seem like a small step, it adds a nice crunch!
        Put a heaping pile of the meat on the bread and top it with a dollop of sour cream.  The cream acts like mayo in a turkey sandwich.  It is also cool and creamy which adds that last element of flavor to make it just right.  
     Now, enjoy the rich, moist flavor of the chicken! The orange flavor is barely identifiable, but add a great layer of flavor and sweetness.  When you are done, write me and let me know how it turned out!

2 Comments

January Gardening Tips

1/16/2012

0 Comments

 
Picture
   The seeds are growing!  Okay, I admit, this is not as exciting as I think it is, but I love it when everything starts to grow again.  
     I've decided that once a month I will write to tell you what I am planting in the vegetable garden.  This way you can have a little nudge and help to schedule your garden.  It is always hard to stop the whirlwind of life to work in the dirt.  However, when I do I always feel more peaceful and grounded.  And there is nothing like walking into a garden and coming back with a whole basket of fresh food! 

In response to my blog about planting seeds inside, I received this:
Robin,
How long do I have to wait to plant seeds if I don't want to plant them inside.  Is it just until we are past the last frost?  Also, can I stagger planting so I have veggies at different times or do they have a specific growing season?
Thanks
Patti

     Fantastic question!! I have about ten different answers in my head.  First of all, if you want to plant directly in the ground you should wait about another month until you are sure the last freeze has passed. Although we have been having a crazy warm winter, you never know what may happen to the temperatures at night.    
     Most vegetables do have specific growing seasons depending on the temperatures that they thrive in.   Others are more hardy and will grow all year once they are established.  The good part is, if you plan out your vegetable garden a bit you can stagger the plants so that you always have something ready to eat (accept maybe in the dead of winter).  This also helps to maximize the space in your garden.  
     Certain plants will thrive in the early spring and be gone in time for summer veggies, and then transfer into a fall and winter garden.  This way you will always have something being produced even if your garden is very small.  When I eat out of the garden I am eating the tastes of the season and that enables me to fully experience the change of seasons!

Picture
January Gardening:
     In January there is still a good chance of a frost, so you mostly want to be preparing your garden for spring planting. Despite this, the daffodils seem ready to get spring started! Take a few minutes here and there to pull up the weeds that have grown.  If you have compost that is ready, spread it around in the dirt, or till it into the soil.  You can also spread a layer or hay or mulch to act as a weed barrier. 
     If you are an urban balcony farmer and using pots, think about getting some new potting soil to replenish the nutrients.  I did this for a few years and had a lot of fun with it!
     Start thinking about greens that like cold weather.  These include lettuces and spinach.  Lettuce will do well in a pot and can really look beautiful and artistic. By planting in a pot, you can keep the seedlings under an overhang and then move them more into the elements as the weather warms.  
     No matter where you are planting it is fun to try and design your planting so that the vegetables look not only delicious but beautiful!  Plant lettuce that grows tall in the middle such as iceberg.  Around that you can put a circle of red leaf lettuce and maybe around the outer circle, a row of low growing butter leaf lettuce.  I also try and apply these principals of decorative veggies in the garden as well. 
    Radishes and beans can also be successful in cold weather. Beans will need a structure to crawl up.  The vines will go as high as they can.  Radishes however only grow about 8-12 inches high.  They need more real estate under ground.  Because of this radishes and beans can be intermingled.  Make sure to loosen the soil with a trowel before planting radishes so that they can easily expand as they grow in the soil. 
    Lastly onions can be started in January.  I have tried onions from seeds and was very unsuccessful.  Last year I bought the little onion starters and had a crop of over 50 onions!
Freezing will kill any new seedling.  So if you do plant outside in January and there is a freeze, make sure to cover the plants.

0 Comments

Waffle Breakfast

1/15/2012

0 Comments

 
Picture
These waffles had a great classic flavor!  This recipe made 10 crispy waffles that were moist and fluffy on the inside.  These, topped with berry sauce, made for a wonderful breakfast! 
This recipe was posted by Megan on allrecipes.com. I didn't make any changes.  I just added a few things, but mostly the toppings!

Ingredients
  • 2 cups all-purpose flour
  • 1 teaspoon salt
  • 4 teaspoons baking powder
  • 2 tablespoons white sugar
  • 2 eggs
  • 1 1/2 cups warm milk
  • 1/3 cup butter, melted
  • 1 teaspoon vanilla extract

Picture
Directions
  1. In a large bowl, mix together flour, salt, baking powder and sugar; set aside. Preheat waffle iron to desired temperature. Make sure to spray it with Pam or some sort of nonstick spray.  
  2. In a separate bowl, beat the eggs. Stir in the milk, butter and vanilla. Pour the milk mixture into the flour mixture; beat until blended. I used my kitchen aid here, but it can certainly be done by hand. 
  3. Ladle the batter into a preheated waffle iron. Cook the waffles until golden and crisp. Serve immediately.  If you want to wait until you have a big enough batch to serve the whole table, put the cooked waffles in the oven at about 200 degrees.  This will keep them warm, but the longer they are in there, the more soggy they get, so don't delay too long.  You can always break the first couple into quarters so everyone can eat while more are cooking and the waffles are crispy!

Picture
4.  While each of the waffles is cooking, work on some of the side dishes and toppings.  I would recommend making the berry sauce from yesterday.  Fresh fruit is always a nice addition.  It not only gives you your daily vitamins, but gives you a feeling of eating fresh, healthy ingredients.  I slices up oranges, and bananas, and had fresh raspberries on the berry sauce.  I also served, butter, powdered sugar and syrup.   Coffee and orange are served as drinks, and the occasional mimosa isn't bad either!

5.  Meat is certainly not necessary in this meal, but you could always add sausage or bacon as a side. Happy Sunday! 

0 Comments

Berry Sauce

1/14/2012

1 Comment

 
Picture
    This is a simple berry sauce that seems to go with whatever I put it on!! It has a sweet but tart flavor.  It is rich enough to make you feel like you have just entered a world of decadence, with a surprise berry here and there.  I have used it as a topping for Chocolate lava cakes. I would imagine that it would go well over a shortcake, or biscuits as well.
     Last weekend I made it and we poured it over waffles. I will put that recipe up tomorrow! You should just plan on having an amazing Sunday morning breakfast.  Invite friends over, or just enjoy whoever is in your house. It is a great way to welcome in the day!   

Picture
    You can use frozen or fresh berries for the sauce, it will taste delicious either way.  I would recommend having some fresh raspberries around as a topping.  
   
Ingredients:
2 cups berries: raspberries, black berries, and/or blue berries 
1/2 cup fresh raspberries
2 tablespoons white sugar
1/3 cup water

Picture
Directions:
    Put two cups of berries in a small sauce pan over medium heat.  Sprinkle 2 tablespoons of white sugar over the top and mix it in.  Add 1/3 cup of water.  
     As the berries are cooking stir the sauce occasionally.  You want to smash some of the berries to release the juice and make it more of a liquid versus a solid.  It is nice to the punch of a berry here and there.
     Boil the mixture to thicken it, add a bit of foaminess, and really enhance the flavor. The time it cooks will depend on what you want the final product to be. Take a look at the pictures above.  For the waffles sauce I only boiled the berry sauce for 5-6 minutes.  I still wanted chunks of berries.  I had blue berries in the mixture so it was a dark, deep color.  For the sauce on the lava cakes I wanted it more smooth without any chunks.  I boiled this for 10 to 12 minutes.  I only used raspberries so it would have a bright pink color.  I mashed the berries thoroughly which produced a smooth, thick sauce.    
   Pour it into a cute little sauce pitcher and off you go! Put some fresh berries out as well to accompany the sauce, or add them to the plate before serving.  This gives it a fresh organic feeling, with the deep flavor of the sauce. 

1 Comment

Grandma Cooking!

1/12/2012

0 Comments

 
Picture
     This is my grandma Edith. I know, she's adorable.  She and my mom decided to try the Shepherd's pie recipe.  They said it was a success!
      If I only I had Mom's kitchen to cook in! You would all get to look at beautiful pictures! My dad helped by being the official taste tester, and of course eating.  Typical.  


0 Comments
<<Previous

    Robin's Blog

    I am living in Downtown 
    Sacramento creating my little urban farm!

    Archives

    June 2014
    April 2014
    January 2014
    July 2013
    April 2013
    January 2013
    November 2012
    October 2012
    September 2012
    August 2012
    July 2012
    June 2012
    May 2012
    April 2012
    March 2012
    February 2012
    January 2012
    December 2011
    November 2011

    Categories

    All
    All
    Appetizers
    Breads
    Breakfast
    Chickens
    Crock Pot
    Desserts
    Fall Foods
    Gardening
    Gifts
    Holiday
    Holiday Foods
    Home Improvements
    Recipes
    Salads
    Sewing
    Soups
    Travel

    RSS Feed

Powered by Create your own unique website with customizable templates.