Robin's Urban Farmhouse
  • Robin\\\\\'s Latest
  • Meet Robin
  • The Chickens
  • The Garden
  • The Bakery
  • The House
  • Untitled

Berry Birthday Pie

3/28/2012

3 Comments

 
Picture
     Today is my sister's birthday, and sadly she doesn't love cake.  So I am making her a mixed berry pie for her birthday.  I love the tartness of the berries with the crisp buttery crust.  My goal for this pie was to make it sure it wasn't a runny mess, because that always makes serving so sloppy! This recipe originally came from allrecipes.com but I made several changes. 
      If you are making this in summer and have access to fresh berries, I would recommend using them! If not, frozen berries will work, but make sure that you thaw them and let any extra water drip out so the pie isn't too runny. 
      I started with my pie crust recipe.  Make sure to double the recipe so you have enough for the top crust and the bottom.  After you make this, put it in the freezer so it can stay nice and cold and easy to work with.  

Picture
Berry Mixture:
  • 1/3 cup all-purpose flour
  • 3/4 cup sugar
  • 1 tablespoon corn starch
  • 1/2 teaspoon ground cinnamon
  • 2 cups fresh blueberries
  • 2 cups fresh raspberries
  • 2 cups blackberries
  • 1 tablespoon lemon juice 
  • 1 tablespoon butter

Picture
Directions:
1. Mix the flour, sugar, and cinnamon together.  Then mix the berries in gently to coat them. 
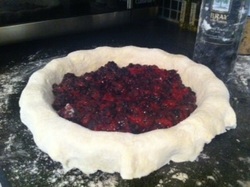
2. Roll out the first half of the dough and tuck it into the bottom of the pie pan.  
3. Gently spread the berry mixture in the center. 
4. Sprinkle a bit of lemon juice on top and chunk up a bit of butter and add it. 

Picture
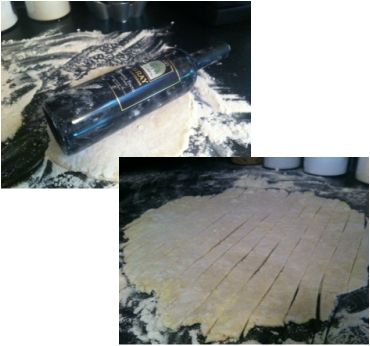
I had been baking at my sister's house last week and left a lot of my stuff there.  So when I went to roll out the dough I realized I didn't have a rolling pin or my rolling cutter! So, I improvised with a wine bottle and a knife.  Better than nothing!

4.  Roll out the second half of the dough and cut it into even strips.  I have a rolling cutter that cuts a scalloped edge which is adorable, but of course I didn't have it either.  No matter what you use to cut the strips make sure to cover it in flour every time it touches the dough so you don't rip it accidently. 

Picture
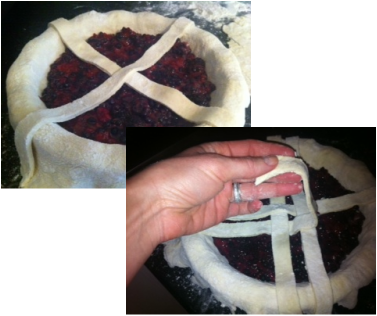
5.  In order to make the laticce crust start by laying the two longest strips at a 90 degree angle.  From there continue to add the next longest strip. I try and make the gap in between the same width as the strips.  Each one should alternate over, under, over, under. Continue this until you reach the edge of the pie in all directions.  Amazingly it will probably take almost every strip even though there are gaps. 

Picture
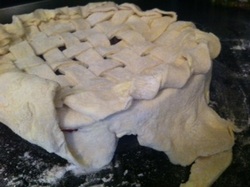
6.  At this point you have a few options.  My sister loves pie crust! So I folded up the extra laticce strips, then folded the excess pie crust over that and pinched it with my fingers.  If you don't want such a bolky crust then trip some before you finish it off.  

Picture
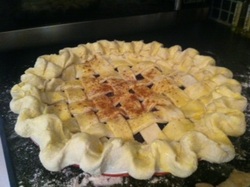
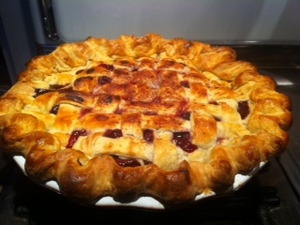
7.  Because I was using homemade pie crust there was flour everywhere.  In order to ensure that the crust looked shiny and beautiful I mixed one egg with a bit of water and brushed it on the surface.  I then sprinkled some sugar and cinnamon on top. 
8. The edges will naturally cook faster, so wrap foil or a crust guard around the edges o the pie.   
9. You are done! Bake it for about 50-60 minutes at 425 degrees until the crust is crispy and golden in the center.

3 Comments

More about the house - The Bedroom

3/23/2012

0 Comments

 
Picture
     Work on the bedroom began on move in day. After all, it is your place to relax and conclude each day.  When we moved in the room was just plain dull.  It was a dark greenish gray that just looked to me like a dreary day.  
     So out with the dull and in with the gold! The paint cans were open as soon as we could get the drop cloths down.  Thank you mom and aunt Wendy for painting this! 

Picture
     I wanted to do vertical stripes to add some interest to the room without adding stuff that takes up space. It was inspired by the Citizen Hotel in downtown Sac.  Initially we just painted the gold in a matt paint.  Then when we got around to it we masked off the stripes with painter's tape.  This was challenging in a 90 year old house because the walls aren't actually straight so there was a lot of eye balling involved.  We painted the cream with a semi-gloss so that there is a difference in sheen.  It is probably about time to put something on that wall, but we have been busy redecorating the living room. 

Picture
    The doors to the bathroom came a few days later.  The bathroom, which connects to our room,   didn't have any handles at all!  This meant that you either let everyone be part of your business or you used a screw driver.  Obviously this was an immediate fix.  Luckily we  found most of the door handles in the basement along with these gorgeous period door plates. Most of them are unique so each door has a slightly different design.  They were all black and tarnished but looked nice after a good scrub! 
   I also oiled all the doors with a tinted oil to bring back the rich color.  

Picture
     At some point in the life of our house the breakfast nook was added behind our room.  I know this because there was the outline of an exterior window in our room that lead to a wall! We debated about all the ways to fix this.  In the end we covered it up.  Now we have a curtain on one wall.  Besides being a great cover for an eye sour, I like the change in texture and the break in the stripes.  
   So that is our bedroom! It feels relaxing a peaceful to me without being dull!  I change the bedspread about three times a year when I am feeling an itch for a new look.  I would love to see other people's rooms if you want to share!

0 Comments

The chickens have flown the coop

3/21/2012

4 Comments

 
Picture
        I am sad to say that we are chickenless.  Last week I came home and before I could even walk in the door, my husband said "You better come see this" and I knew it was going to be bad.  Sad little Chicken Nugget was laying on her side unable to stand up.  We really couldn't figure out what was wrong with her.  So we made her a nest out of towels in a laundry basket and brought her inside so she would be warm.  She wasn't eating or drinking and barely opening her eyes.  Physically she was a mess.  When I walked by talking she would perk up and try and get to her feet but couldn't.  To make a long and gruesome story short she is gone.  
   I was surprised at how sad I was.  I know she is just a chicken, and I eat chicken, but she added a lot of personality to the backyard and it is so quiet now!  Every time I would walk in the backyard they would scurry over to the fence as fast as they can and be undeservingly eager to see me.  Now, it is just quiet. 

Picture
      Poor Barbecue poked around calling for her for a few days.  Then one day we went outside and then we walked into the basement.  She let out the loneliest cry ever and we decided living alone was not a good life for her.  Nugget and Barbecue had never spent a night apart.  I actually read that chickens won't survive alone because they are such social creatures.  We ended up finding family of a friend who has six chickens out in Shingle Springs and taking Barbecue up there.  I have gotten word that she has integrated with the other hens and is laying eggs again! 
   

Picture
Picture
 So, we have gone from a house full of chickens to an empty nest.  Sad.

4 Comments

Easter Egg Gifts

3/19/2012

0 Comments

 
Picture
     Here is an adorable little gift you can make that costs almost nothing!  I saw it on the cover of Starting From Seed and couldn't resist. I am going to give it to my family for a little Easter present.  These are Zinnia plants, so hopefully they will bring beautiful flowers! The recipient can crush the shell a bit and put it in the ground.  Done!
   

Picture
    Simply take a few eggs and poke a hole in the bottom. This is so water can flow out and not flood the seeds.  I used a metal barbecue skewer and tapped until a hole broke through.  
    Then hold the egg over a dish and tap with a knife along the top the basically cut the top off.  Plop the egg in your dish and rinse out the shell and set it to dry.  Eat the eggs of course. 

Picture
    Find something to put the eggs shells where they won't rock around.  FIll each egg about 3/4 of the way full of dirt.  Put three seeds in each to ensure that at least one grows.  If they all grow you may have to remove some. Water and wait! Soon you will have adorable sprouts.  
      I am hoping they will continue to grow until Easter.  I am watering them every few days and setting them outside here and there.  Mostly they are sitting on the window sill in the basement looking cute! Have fun. 

0 Comments

St. Patty's Corned Beef and Cabbage

3/15/2012

0 Comments

 
Picture
This is one of those delicious meals that you get major bang for your buck.  It is a super easy meal that takes minimal effort and you get a flavorful delicious mess at the end!  You literally have to buy three things: Brined corned beef, potatoes, and one head of cabbage.  If you love cooked carrots you can throw those in too.  

Picture
    I love the Raley's corned beef.   I have tried the Trader Joe's but we gave it a C-.  I took a picture of the package in case you want to grab the exact one.  I know it is kind of cheating to buy the meat pre-brined, but it is SOOO much better that way! 
    Put the meet in your slow cooker and shove the potatoes around the side.  If it includes seasoning sprinkle this on top of everything.  Then add enough water to submerge the ingredients.  You can cook this on high for about 8 hours or low for 4.  I usually put it in before work and leave with the peace of mind that dinner is already cooked! 

Picture
My crock put doesn't have enough room to cook everything.  So when I get home I take out the meat and potatoes, put them on a platter and keep them warm in the oven.  Cut one head of cabbage into quarters and trim a bit of the bottom off.  I then cook the cabbage in the water that is left for 1 hour on high.  This lets all the yummy flavors of the brine soak into the cabbage.  
   When this is almost done you can slice the meat.  Make sure togo against the grain of the meat.  Add the cabbage to the platter, and walk out to the dining room table like you slaved away all day! 

Happy St. Patrick's Day!
  

0 Comments

Lemon Blackberry Cake

3/11/2012

1 Comment

 
Picture
My friend Erica had a baby shower this weekend to welcome in their first little baby! They are waiting for the big surprise at birth to see if it is a boy or a girl.  So for the cake I decided to follow the theme of the invitations and go with baby carriages.  I made a lemon cake with a black berry filling and a meringue frosting.  I used a Martha Stewart recipe.  

Picture
I make the decorations the night before to simplify everything a bit.  I started by taking small chunks of fondant that I bought at Michael's.  I tinted them with either a gel frosting or the intense cake coloring.  Avoid using regular food coloring because it is too wet and will make the fondant sticky. After you tint it, roll out the fondant using powdered sugar so it doesn't stick.  I then used cookie cutters. After that I added details with sprinkles, indentations with a toothpick, or painting them with food coloring. When all the decorations were done I covered them with plastic wrap over night. 

Picture
Cake Ingredients
  • 1 cup (2 sticks) unsalted butter, room temperature, plus more for pans
  • 2 1/2 cups all-purpose flour (spooned and leveled), plus more for pans
  • 1/2 teaspoon baking powder
  • 1/2 teaspoon baking soda
  • 1 teaspoon salt
  • 1 tablespoon lemon zest
  • 2 cups sugar
  • 2 large eggs plus 3 large egg yolks
  • 1/4 cup plus 2 tablespoons fresh lemon juice
  • 1 cup low-fat buttermilk
  • 1 lemon, thinly sliced and seeded

***I made a double recipe and then made a three layer stacking cake.  I had a bit of extra batter that I threw in some cupcake tins. This recipe makes for a beautiful flat perfect cake for stacking.  It make kind of pitiful cupcakes. 

Directions
  1. Preheat oven to 350 degrees. Butter and flour two 8-by-2-inch cake pans, tapping out excess flour. In a medium bowl, whisk flour, baking powder, baking soda, salt, and lemon zest.
  2. In a large bowl, using an electric mixer, beat butter and 1 1/2 cups sugar until light and fluffy. With mixer on low, beat in eggs and yolks, one at a time. Beat in 2 tablespoons lemon juice. Alternately beat in flour mixture and buttermilk beginning and ending with flour mixture; mix just until combined.
  3. Divide batter between pans; smooth tops. Bake until cakes pull away from sides of pans, 32 to 35 minutes. Let cool in pans 10 minutes. Run a knife around edges of pans and invert cakes onto a wire rack.
  4. While cakes are baking, bring remaining 1/2 cup sugar and 1/2 cup water to a boil in a saucepan. Add lemon slices and simmer 25 minutes. Using a slotted spoon, transfer lemon slices to a waxed-paper-lined plate. Stir remaining 1/4 cup fresh lemon juice into syrup. ***I did this next step and I didn't end of using the lemons because of my decorations, so this isn't necessary***
  5. Using a toothpick, poke holes in warm cakes on rack. Brush with lemon syrup. Let cool completely. Prepare frosting, substituting 2 tablespoons fresh lemon juice for vanilla extract. Frost cooled cakes and top with candied lemon slices.

Picture
     If you are stacking cake layers higher than two layers, I would recommend taking a good look at them to see if they are flat.  If not, when the cake is completely cool, trim a bit with a bread knife and flatten things out.  Put the trimmed side down so you are not trying to spread frosting on the cut edge. 
     Before laying the cake on the serving plate I like to put down a border of wax paper.  This way you can frost the cake without haveing to be too careful.  At the end of frosting slide it out, fix anything that needs it around the border, and you have a clean cake plate to serve from. 

Picture
Frosting Ingredients
  • 3 large egg whites
  • 3/4 cup sugar
  • Pinch of salt
  • 1/3 cup water
  • 1/4 teaspoon pure vanilla extract
Directions
  1. In a heatproof bowl set over (not in) a saucepan of simmering water, combine egg whites, sugar, salt, and water. Cook over medium, stirring constantly, until sugar has dissolved (or mixture registers 150 degrees on an instant-read thermometer), 2 to 3 minutes. Transfer to a large bowl. Using an electric mixer, beat on medium-high until glossy, stiff peaks form (do not overbeat), about 3 minutes; reduce speed to low, add vanilla extract, and beat just until combined. Use immediately.

Picture
***This frosting was very light and meringue-like.    It was a bit hard to form to the cake because initially it is very viscus and then sets up quickly so you have to work fast. If I were to do this again I would use a butter cream recipe.  It gives you tons of flexibility with shaping and spreading it on a cake however it is a rich, thick flavor so you have to decide what you are prefer. 

After making the frosting I scooped some into a separate bowl and mixed it with slices blackberries.  Make sure to rinse and dry the berries well so excess water doesn't ruin the frosting. Spread this in between the layers of cake.  It adds a bit of sour that contrasts well with the sweet cake. 

Picture
   When are the layers are construction I plop a bunch of frosting on the top of the cake.  I slowly spread it out until it starts spilling over the sides.  Then as it does I shape it down the side of the cake.  It is easier to encourage the frosting to go down than up! 


Picture
   When everything is set, carefully place the fondant decorations on the cake. Squish them in a little so nothing peals back off.   For me presentation is half the fun, so make sure you have a cake plate that you love! I found this one a few weekends ago in the back of an antique shop.  After about an hour of polishing it shined right up!

1 Comment

Tropical Dreams

3/8/2012

1 Comment

 
Picture
   My family and I recently took a wonderful long weekend to Kauai.  Besides the breathtaking views, tropical drinks on the beach, and wonderful sea life, there was the most fun fruit! There was fruit I had never seen and definitely never eaten before.  I thought I would share! 
    When we got there and my mom and sister had just run to the fruit stand.  They had these crazy little spiky red fruits.  You had to score the outside and then when you peeled off the skin it was like a giant grape inside! After some research my husband discovered it is called a Dragon's Eye.  I would recommend trying it!

Picture
    Because of the time change, we woke up very early on the first day and hiked out to some cliffs to watch the sunrise.  We found these amazing caves and had fun spelunking around.  On the walk back we were greeted by banans tree after banana tree.  It was amazing to see how they grow! There is a huge flower and under each petal an entire bunch of bananas grows out! And all of this came from banana tress that were only about 5 feet tall.  After the spelunking we returned for a yummy fruit breakfast. We enjoyed fresh papaya, pineapple, and apple bananas.  I don't know if that is what they are really called, but they have these tangy amazing little bananas that taste like they are have some apple flavor in them.  

Picture
About ten years ago there was a hurricane that decimated all of the chicken coops on the island! Who would have thought?? I guess they had a bunch of chickens for cock fighting.  The result is that the chickens are now wild, show quality beautiful, and running the island.  So as you are relaxing on the beach the chickens come by to check you out, which I guess is better than peddlers!

Picture
     In addition there were these crazy fruits that looked like wooden grapes.  When you peel off the wooden shell it actually look like a grape inside. I think it may have been lyche.  However, it tasted somewhat fermented and I wasn't a huge fan.  Interesting though! 
    

Picture
      Besides getting to spend all the time with my family, one of the major highlights of my trip was an unbelievable hike along the Napali Coast.  It is part of the island you can only get to by foot.  At the end of a four mile hike we arrived at a 300 foot waterfall!! This picture only shows the bottom of it.  We of course jumped in and swam behind it, although the water was freezing! After a very muddy hike back there was a Hawaiian kid waiting at the bottom with a freshly husked coconut and a straw! 

Heaven. 

1 Comment

    Robin's Blog

    I am living in Downtown 
    Sacramento creating my little urban farm!

    Archives

    June 2014
    April 2014
    January 2014
    July 2013
    April 2013
    January 2013
    November 2012
    October 2012
    September 2012
    August 2012
    July 2012
    June 2012
    May 2012
    April 2012
    March 2012
    February 2012
    January 2012
    December 2011
    November 2011

    Categories

    All
    All
    Appetizers
    Breads
    Breakfast
    Chickens
    Crock Pot
    Desserts
    Fall Foods
    Gardening
    Gifts
    Holiday
    Holiday Foods
    Home Improvements
    Recipes
    Salads
    Sewing
    Soups
    Travel

    RSS Feed

Powered by Create your own unique website with customizable templates.