
This Presidents Day weekend we spent an amazingly fun three days in Tahoe with our friends. We rented a cabin and hung out, ate good food, made sledding ramps, skied, and enjoyed the mountains. The lack of snow, and fresh mountain air jolted me into spring mode and inspired me to come home and work in the garden. I also realized that is was about time for the February gardening post since February is half way over!
I decided I would categorize this into three posts so they are not too long. So today I will write about preparing the soil. Then the next two days I will tell you what I have been planting and harvesting. Who knew there could be so much to dirt!
I decided I would categorize this into three posts so they are not too long. So today I will write about preparing the soil. Then the next two days I will tell you what I have been planting and harvesting. Who knew there could be so much to dirt!
How to Prepare the Soil:
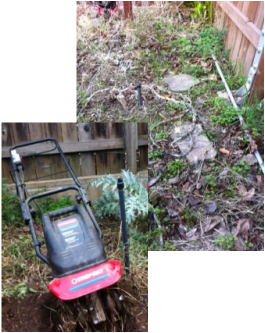
I looked out in my garden today and saw a field of weeds that I was not excited to pick all winter. Obviously this is not a good environment for new seedlings to thrive, so out with the old, in with the new. We have this extremely hardy awful grass that likes to grow in our yard, so I had to get out the big guns! My RotoTiller.
It is my woman power tool. It chops weeds, loosens the soil, and mixes in the compost all in one. I know I sound like an infomercial for it, but it does good work. You can rent them at Home Depot if you don't have one, or if you are feeling like you need a particularly good workout you can do it by hand with a hoe.
Step One:
Get rid of anything that will get jammed in the rototiller blade, old markers from last years planting, rocks, big sticks, and any other random things that may have found their way into the garden. I had about three major jams that really slowed me down! This year I will not be using little wire signs to label the garden.
Step Two:
Till everything once. I only do one planter box at a time. So it only takes about five minutes. This will cut up any major weeds and loosen the soil around the roots. I have a very small tiller so that I can go in between sprinkler lines and existing rows of plants. Then pull remaining weeds.
Step Three:
Turn the compost so it continues to rot. See the compost blog if you are curious about this process. Spread any compost material that is ready on top of the soil. If you don't compost you can use plant vitamins from the hardware store.
Step Four:
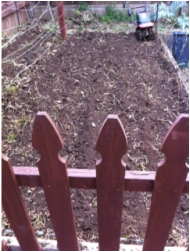
Till the soil again to further cut up any remaining weeds, mix in compost and loosen the soil. I recommend starting at one end and pulling the rototiller towards you so you don't walk on the fresh soil. When you are done it will be light and fluffy and ideal for fresh little roots. You can plant now, or leave that for another day. As you can see I still have some weeds in there to tackle, but small victories work well for me! Until tomorrow...
Get rid of anything that will get jammed in the rototiller blade, old markers from last years planting, rocks, big sticks, and any other random things that may have found their way into the garden. I had about three major jams that really slowed me down! This year I will not be using little wire signs to label the garden.
Step Two:
Till everything once. I only do one planter box at a time. So it only takes about five minutes. This will cut up any major weeds and loosen the soil around the roots. I have a very small tiller so that I can go in between sprinkler lines and existing rows of plants. Then pull remaining weeds.
Step Three:
Turn the compost so it continues to rot. See the compost blog if you are curious about this process. Spread any compost material that is ready on top of the soil. If you don't compost you can use plant vitamins from the hardware store.
Step Four:
Till the soil again to further cut up any remaining weeds, mix in compost and loosen the soil. I recommend starting at one end and pulling the rototiller towards you so you don't walk on the fresh soil. When you are done it will be light and fluffy and ideal for fresh little roots. You can plant now, or leave that for another day. As you can see I still have some weeds in there to tackle, but small victories work well for me! Until tomorrow...
 RSS Feed
