Robin's Urban Farmhouse
  • Robin\\\\\'s Latest
  • Meet Robin
  • The Chickens
  • The Garden
  • The Bakery
  • The House
  • Untitled

1920's Here We Come - The Living Room

6/6/2012

4 Comments

 
Picture
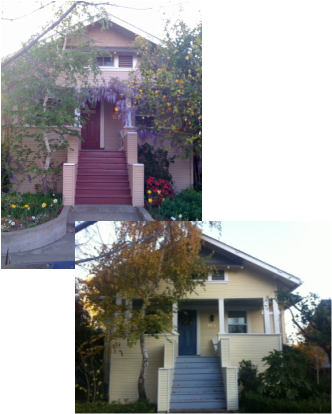
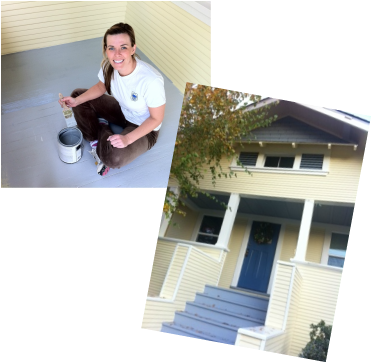
  Our most recent house project has been redecorating the living room.  Although we spend the most time here, it somehow got pushed to the back burner.  My husband and I love the feeling of old houses.  There is a charm and elegance that makes me feel like I am part of something special.  So we decided to try and preserve that old world charm in our new furniture.  Our house was built in 1920 and I love that look anyways, so we tried to keep that vintage. 

Picture
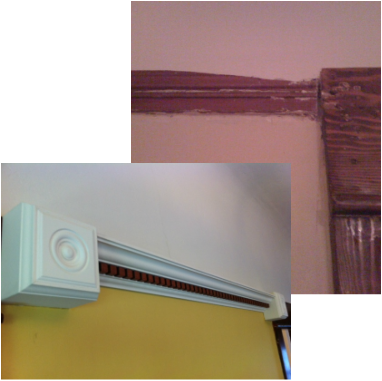
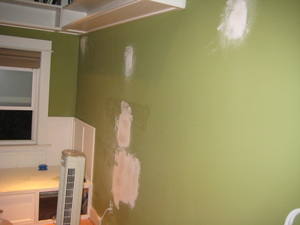
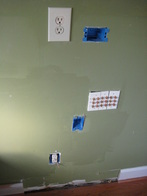
   The walls in our house are made of plaster and lath.  This means that it is hard to hang things on the wall.  Thus, people hang things on the picture molding.  After 90 years of hanging pictures it looked like this.  
    Honestly it made the whole living and dining room look pretty cruddy.  We decided as a brave engaged couple that we would reconstruct the molding.  It would be good practice in "communicating" before our upcoming wedding, and believe me it was! 
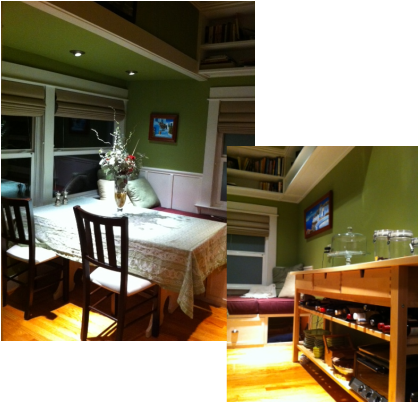
   It took us a long time, and about 1,000 cuts with the compound mider saw. Eventually we ended up with the second picture.  We painted the crown molding, then stained the dental piece to match the other wood in the room.  For the ends we bought the medallions, constructed boxes out of them.  We mostly added these because we couldn't figure out the proper angles to end the molding.  I think it looks great and it compliments the other period details!

Picture
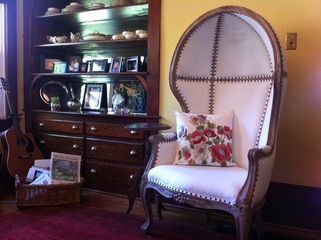
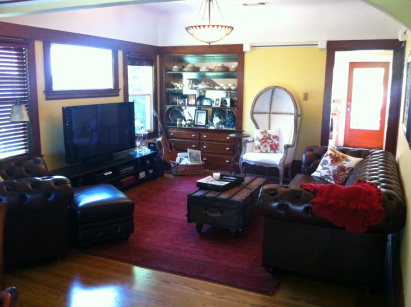
  Now about three years later we began the hunt for furniture. The first piece we found was this amazing chair from Hause in East Sac.  It is styled after a porter chair from the 1880's.  In the old castles the doorman would have to sit in the drafty entryway.  The dome was designed to give some protection from the elements! I wanted an interesting signature piece to go next to the china hutch.

Picture
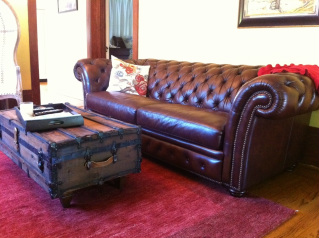
   For our couch and chair we decided to go with a 1920's tufted chesterfield couch.  They are very comfortable and give the room a feeling of richness and sophistication. I almost had a heart attack when they arrive because the furniture is huge and bulky for our little house.  But once it was all in place I coudn't be happier with it. 
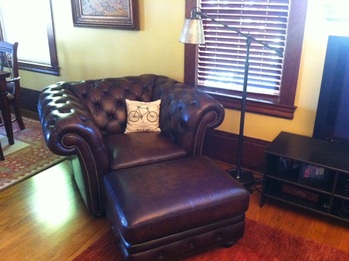
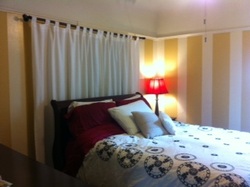
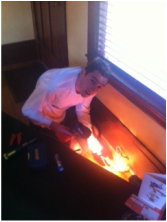
     This quickly became my new favorite reading chair.  So we hunted around to find the perfect reading lamp.  The shade on this is made of Mica so it has a really neat glow that doesn't come across in pictures. 

Picture
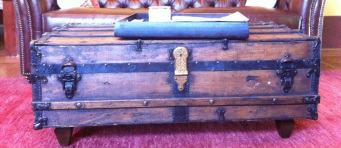
The last piece in this room was the coffee table.  I had fallen in love with a trunk I saw at Restoration Hardware, but who has four thousand dollars to throw at a coffee table? So I hunted on Craig's list until I found the perfect one for less than two hundred. One person's trash can be another's treasure!  We found this amazing old trunk  in Lincoln. We brought it home, slapped some legs on the bottom to make it high enough, and whuala! Coffee table with storage! 

Picture
Last but not least we purchased a rug for the dining room.  We found one that matched the living room in color but was a bit more formal.  It gave the rooms good separation.  

Picture
Now we kick up our feet and enjoy the finished product!

4 Comments

More about the house - The Bedroom

3/23/2012

0 Comments

 
Picture
     Work on the bedroom began on move in day. After all, it is your place to relax and conclude each day.  When we moved in the room was just plain dull.  It was a dark greenish gray that just looked to me like a dreary day.  
     So out with the dull and in with the gold! The paint cans were open as soon as we could get the drop cloths down.  Thank you mom and aunt Wendy for painting this! 

Picture
     I wanted to do vertical stripes to add some interest to the room without adding stuff that takes up space. It was inspired by the Citizen Hotel in downtown Sac.  Initially we just painted the gold in a matt paint.  Then when we got around to it we masked off the stripes with painter's tape.  This was challenging in a 90 year old house because the walls aren't actually straight so there was a lot of eye balling involved.  We painted the cream with a semi-gloss so that there is a difference in sheen.  It is probably about time to put something on that wall, but we have been busy redecorating the living room. 

Picture
    The doors to the bathroom came a few days later.  The bathroom, which connects to our room,   didn't have any handles at all!  This meant that you either let everyone be part of your business or you used a screw driver.  Obviously this was an immediate fix.  Luckily we  found most of the door handles in the basement along with these gorgeous period door plates. Most of them are unique so each door has a slightly different design.  They were all black and tarnished but looked nice after a good scrub! 
   I also oiled all the doors with a tinted oil to bring back the rich color.  

Picture
     At some point in the life of our house the breakfast nook was added behind our room.  I know this because there was the outline of an exterior window in our room that lead to a wall! We debated about all the ways to fix this.  In the end we covered it up.  Now we have a curtain on one wall.  Besides being a great cover for an eye sour, I like the change in texture and the break in the stripes.  
   So that is our bedroom! It feels relaxing a peaceful to me without being dull!  I change the bedspread about three times a year when I am feeling an itch for a new look.  I would love to see other people's rooms if you want to share!

0 Comments

The Kitchen

12/27/2011

1 Comment

 
Picture
    The kitchen is really the heart and soul of our house.  For one it is always the warmest room, due to our old old oven.  For two it is full of food.  So, people always tend to congregate in there. 
     Luckily for us, the previous owners did a nice renovation in the kitchen.  They modernized some features like the backsplash, counter tops, and hood, but kept some of the great period details like the Wedgewood stove and hard wood.  Our stove is still complete with an original timer and little salt and pepper shakers. 
    

Picture
   I have added a few things that make it more user friendly and give it some character.  My mom gave us a pot rack for Christmas, so that was the first addition.  This saves so much space in the cupboards!!
   The island looks out over the porch and backyard so it is a great place to cook! We shortened and painted the stools so that we could actually sit at the island.  Usually these stools are used by guests who are hanging out during cooking. 
 

Picture
   The walls in the kitchen are still the old plaster and lath, and were riddled with holes and scrapes from years of cooking.   This summer I got up on my little ladder, filled in the cracks in the plaster, sanded them down and repainted.  This really cleaned things up!
     Then I had a whole patch of wall by the sink that was all naked.  I decided to put a chalk board, so I could write recipes that I use often.  What teacher can refuse a chalkboard!  Most of the time the recipe for bread it up so I can quickly pop the ingredients into the bread maker and be done with it. 
    The chalkboard is fun, and not too complicated.  There was of course a mandatory trip to the hardware store where I got a can of chalkboard paint, the molding, and one small piece of wood to hold the actual chalk.  I measured and taped off the area where I wanted the board.  I actually used saran wrap and painters tape, so that there was a large area covered.  Then I put two coats of chalkboard paint up.  While these were drying I measured and cut the edging.  I then painted it with two coats of white paint we had laying around the basement.  When everything was dry I removed the tape.  I nailed in the molding, then touched up the paint over the nails.  I love the look of it, and it would be great for a kids room!
    My neighbor had given me the most adorable measuring cups you have ever seen and I wanted a place to display them.  So I went to Target, found those great shelves and put them up.  The measuring cups are on the bottom shelf.  Those few changes really dressed up the whole area and made it a lot more interesting! One room completed, on to the next! Happy cooking!

1 Comment

Holes in the where?

12/10/2011

1 Comment

 
Picture
    The nook. Hole repair.  Not an anticipated project.  Not something we knew how to do.  Thank goodness for wireless internet that has videos of all kinds of home improvement projects!
     When the previous owners moved out of our house, they took with them the 6 speakers that they had installed in the 100 square foot breakfast nook.  This was of course contrary to the contract that said built in stuff was supposed to stay.  Regardless, we had a bunch of big holes in our wall.  My resourceful husband found a "how to" video on This Old House's website.  We watched, paused, fixed, and watched again.  

Picture
Here is the basics of how we did it:
1) Cut the existing hole to a clean rectangle.  
2) Put two small boards or stakes inside the hole behind the drywall. This can be done with one board if the hole is fairly small.  With your hand or a string, pull the board tight to the wall and put a screw on the top and the bottom. This will give you a stable place to attach a new piece of drywall. 
3) Cut a piece of drywall that is slighter smaller than your exhisting hole.  Attach this by putting a screw through the drywall and into the stabilizing boards. 
4) Cover the whole concoction with spackle.  Smooth it out with a putty knife.
5) Let that dry overnight and then sand it smooth.
6) Add another layer of spackle. 
7) Let it dry and sand the second layer smooth. 
8) When you paint over the patched area, make sure that paint is a good match! If not I would suggest painting the whole wall again. 

Picture
     Now the breakfast nook is my favorite room in the house.   The windows look out into the garden and the morning sun pours in onto the bench.  It is absolutely the perfect place to fall into a good book and a hot cup of coffee.   This is in summer when I am not teaching of course!

1 Comment

Who knew there were so many shades of yellow...

12/5/2011

0 Comments

 
Picture
Painting The House: 
     It was brought to my attention, that this blog is called Robin's Urban Farmhouse, and I have written very little about the house! So, I am going to make an effort to include some of our house projects. On top is the house when we bought it.  The paint had since gotten worse.  The bottom picture is what it looks like now! 
     When we bought the house there was A LOT to be done.  It was a like a puppy, so cute and loveable, but so messy and time consuming!
     Our house was missing key things, like door handles on the bathroom.  Apparently the last owners and their two kids either didn't close the bathroom door or got out a screw driver every time they walked in or out. That was obviously one of the first things to be fixed.  
     

Picture
     We made a list.  We only let ourselves put five projects on the To Do List at a time so we wouldn't get overwhelmed.  I am a total list person! We worked on those five projects, and we got great satisfaction from crossing a project off when we finished it.  We have kept this list thing going.  I think we have one page for each of the years we have been here.  
   Of course there are always projects to add, but last week we crossed off our LAST major project on the list.  We finished painting the house! With a 90 year old house, everything is done a little differently than a new house.  For example, it is hard to replace an interior door, because they were all cut by hand to fit the specific door frame.  So a door that is actually a prefect rectangle, won't fit in the door frame!! Frustrating.       

Picture
   Painting the house was no different.  You can't just paint the house.  You have to water blast the house and catch and clean EVERY little flake of paint, because back in the day they used lead based paint. Then you have to scrape what is left.  Then fill in the holes in the old redwood siding with Bondo.  Then sand it all.  Then prime it.  At this point you can think about paint. I have to admit.  We hired a handyman to 90% of this.  
     Justin and I haggled over colors, painted about 6 different yellow on our house, which I am sure the neighbors enjoyed, and finally came to an agreement! Thank you to my parents who mixed more quarts of yellow paint for us than I can count!  We did the final touch up of the pain ourselves.  This means that I painted it.  Justin isn't really allowed to paint much around here, because I have to repaint them after :) I think he does this on purpose.
    For a final touch we discarded an absolutely ugly old light that we had a got a charming lantern for the front porch.  DONE! Dust off the hands, wash the paint brushes, and hopefully store them in the basement for a long, long time...
   

0 Comments

The Holidays Are Here!

12/3/2011

2 Comments

 
Picture
    This morning I arrived home after a walk to see my husband pulling electrical wires out of a hole in the dining room wall.  I have to admit, this made me more than a little nervous since most of our home improvement project kind of follow the "guess and check" mentality.  Electricity is not really great to guess with.  

Picture
     Anyways, he ended up running the wire through the floor, connecting it with some other wire in the basement, then back through the wall and out onto the front porch.  I obviously know a lot about the stuff!  Then he started sawing a hole in the freshly painting redwood siding on the front porch.  At the point I went into the backyard to avoid freaking out.  The good news is, he ended up installing a neat and tidy electrical outlet on the front porch. 

Picture
    The electrical outlet means, we get to put up Christmas lights!!! And now with the cozy glow if twinkle lights the Christmas season has officially begun for me!
Merry Christmas!

2 Comments

    Robin's Blog

    I am living in Downtown 
    Sacramento creating my little urban farm!

    Archives

    June 2014
    April 2014
    January 2014
    July 2013
    April 2013
    January 2013
    November 2012
    October 2012
    September 2012
    August 2012
    July 2012
    June 2012
    May 2012
    April 2012
    March 2012
    February 2012
    January 2012
    December 2011
    November 2011

    Categories

    All
    All
    Appetizers
    Breads
    Breakfast
    Chickens
    Crock Pot
    Desserts
    Fall Foods
    Gardening
    Gifts
    Holiday
    Holiday Foods
    Home Improvements
    Recipes
    Salads
    Sewing
    Soups
    Travel

    RSS Feed

Powered by Create your own unique website with customizable templates.